图像处理
图像资源
要处理图像,您必须将文件作为页面资源、全局资源或远程资源进行访问。
页面资源
页面资源是页面包中的文件。页面包是以 index.md 或 _index.md 文件为根目录的目录。
content/
└── posts/
    └── post-1/           <-- page bundle
        ├── index.md
        └── sunset.jpg    <-- page resource
要将图像作为页面资源访问
{{ $image := .Resources.Get "sunset.jpg" }}
全局资源
全局资源是 assets 目录中的文件,或任何挂载到 assets 目录的目录中的文件。
assets/
└── images/
    └── sunset.jpg    <-- global resource
要将图像作为全局资源访问
{{ $image := resources.Get "images/sunset.jpg" }}
远程资源
远程资源是位于远程服务器上的文件,可通过 HTTP 或 HTTPS 访问。要将图像作为远程资源访问
{{ $image := resources.GetRemote "https://gohugo.com.cn/img/hugo-logo.png" }}
图像渲染
一旦您将图像作为资源访问,请使用 Permalink、RelPermalink、Width 和 Height 属性在模板中渲染它。
示例 1:如果未找到资源,则抛出错误。
{{ $image := .Resources.GetMatch "sunset.jpg" }}
<img src="{{ $image.RelPermalink }}" width="{{ $image.Width }}" height="{{ $image.Height }}">
示例 2:如果未找到资源,则跳过图像渲染。
{{ $image := .Resources.GetMatch "sunset.jpg" }}
{{ with $image }}
  <img src="{{ .RelPermalink }}" width="{{ .Width }}" height="{{ .Height }}">
{{ end }}
示例 3:如果未找到资源,跳过图像渲染的更简洁方法。
{{ with .Resources.GetMatch "sunset.jpg" }}
  <img src="{{ .RelPermalink }}" width="{{ .Width }}" height="{{ .Height }}">
{{ end }}
示例 4:如果访问远程资源时出现问题,则跳过渲染。
{{ $url := "https://gohugo.com.cn/img/hugo-logo.png" }}
{{ with try (resources.GetRemote $url) }}
  {{ with .Err }}
    {{ errorf "%s" . }}
  {{ else with .Value }}
    <img src="{{ .RelPermalink }}" width="{{ .Width }}" height="{{ .Height }}">
  {{ else }}
    {{ errorf "Unable to get remote resource %q" $url }}
  {{ end }}
{{ end }}
图像处理方法
image 资源实现了 Process、Resize、Fit、Fill、Crop、Filter、Colors 和 Exif 方法。
Process
v0.119.0 中的新功能Process 使用给定的规范处理图像。规范可以包含可选操作,即 resize、crop、fit 或 fill 之一。这意味着您可以使用此方法代替 Resize、Fit、Fill 或 Crop。
有关可用选项,请参阅选项。
您还可以使用此方法应用不需要任何缩放的图像处理,例如格式转换
{{/* Convert the image from JPG to PNG. */}}
{{ $png := $jpg.Process "png" }}
更多示例
{{/* Rotate the image 90 degrees counter-clockwise. */}}
{{ $image := $image.Process "r90" }}

{{/* Scaling actions. */}}
{{ $image := $image.Process "resize 600x" }}
{{ $image := $image.Process "crop 600x400" }}
{{ $image := $image.Process "fit 600x400" }}
{{ $image := $image.Process "fill 600x400" }}
调整大小
将图像调整为给定的宽度和/或高度。
如果同时指定宽度和高度,除非原始图像具有相同的宽高比,否则生成的图像将不成比例地缩放。
{{/* Resize to a width of 600px and preserve aspect ratio */}}
{{ $image := $image.Resize "600x" }}

{{/* Resize to a height of 400px and preserve aspect ratio */}}
{{ $image := $image.Resize "x400" }}

{{/* Resize to a width of 600px and a height of 400px */}}
{{ $image := $image.Resize "600x400" }}
自适应
缩小图像以适应给定的尺寸,同时保持宽高比。您必须同时提供宽度和高度。
{{ $image := $image.Fit "600x400" }}
填充
裁剪并调整图像大小以匹配给定的尺寸。您必须同时提供宽度和高度。使用 anchor 选项来更改裁剪框的锚点。
{{ $image := $image.Fill "600x400" }}
裁剪
裁剪图像以匹配给定的尺寸而不调整大小。您必须同时提供宽度和高度。使用 anchor 选项来更改裁剪框的锚点。
{{ $image := $image.Crop "600x400" }}
滤镜
对图像应用一个或多个滤镜。
{{ $image := $image.Filter (images.GaussianBlur 6) (images.Pixelate 8) }}
使用管道以更函数式的方式编写此代码。 Hugo 按给定的顺序应用滤镜。
{{ $image := $image | images.Filter (images.GaussianBlur 6) (images.Pixelate 8) }}
有时,一次创建滤镜链然后重复使用会很有用。
{{ $filters := slice  (images.GaussianBlur 6) (images.Pixelate 8) }}
{{ $image1 := $image1.Filter $filters }}
{{ $image2 := $image2.Filter $filters }}
颜色
.Colors 使用简单的直方图方法返回一个包含图像中主要颜色的十六进制字符串切片。
{{ $colors := $image.Colors }}
此方法速度很快,但如果您也缩小图像,则从缩小的图像中提取颜色会获得更好的性能。
EXIF
提供包含图像元数据的 EXIF 对象。
您可以访问 JPEG、PNG、TIFF 和 WebP 图像中的 EXIF 数据。为防止处理没有 EXIF 数据的图像时出现错误,请将访问权限包装在 with 语句中。
{{ with $image.Exif }}
  Date: {{ .Date }}
  Lat/Long: {{ .Lat }}/{{ .Long }}
  Tags:
  {{ range $k, $v := .Tags }}
    TAG: {{ $k }}: {{ $v }}
  {{ end }}
{{ end }}
您还可以单独访问 EXIF 字段,使用 lang.FormatNumber 函数根据需要格式化字段。
{{ with $image.Exif }}
  <ul>
    {{ with .Date }}<li>Date: {{ .Format "January 02, 2006" }}</li>{{ end }}
    {{ with .Tags.ApertureValue }}<li>Aperture: {{ lang.FormatNumber 2 . }}</li>{{ end }}
    {{ with .Tags.BrightnessValue }}<li>Brightness: {{ lang.FormatNumber 2 . }}</li>{{ end }}
    {{ with .Tags.ExposureTime }}<li>Exposure Time: {{ . }}</li>{{ end }}
    {{ with .Tags.FNumber }}<li>F Number: {{ . }}</li>{{ end }}
    {{ with .Tags.FocalLength }}<li>Focal Length: {{ . }}</li>{{ end }}
    {{ with .Tags.ISOSpeedRatings }}<li>ISO Speed Ratings: {{ . }}</li>{{ end }}
    {{ with .Tags.LensModel }}<li>Lens Model: {{ . }}</li>{{ end }}
  </ul>
{{ end }}
EXIF 方法
- 日期
- (
time.Time) 返回图像创建日期/时间。使用[time.Format]函数格式化。
- 纬度
- (
float64) 返回 GPS 纬度(以度为单位)。 - 经度
- (
float64) 返回 GPS 经度(以度为单位)。 - 标签
- (
exif.Tags) 返回此图像可用的 EXIF 标签的集合。您可以在站点配置中包含或排除此集合中的特定标签。
图像处理选项
Resize、Fit、Fill 和 Crop 方法接受以空格分隔、不区分大小写的选项列表。列表中选项的顺序无关紧要。
尺寸
使用Resize方法,您必须指定宽度、高度或两者。 Fit、Fill 和 Crop 方法需要宽度和高度。所有尺寸均以像素为单位。
{{ $image := $image.Resize "600x" }}
{{ $image := $image.Resize "x400" }}
{{ $image := $image.Resize "600x400" }}
{{ $image := $image.Fit "600x400" }}
{{ $image := $image.Fill "600x400" }}
{{ $image := $image.Crop "600x400" }}
旋转
按给定的角度逆时针旋转图像。 Hugo 在缩放之前执行旋转。例如,如果原始图像为 600x400,并且您希望逆时针旋转图像 90 度,同时将其缩放 50%
{{ $image = $image.Resize "200x r90" }}
在上面的示例中,宽度表示旋转后所需的宽度。
要在不缩放的情况下旋转图像,请使用原始图像的尺寸
{{ with .Resources.GetMatch "sunset.jpg" }}
  {{ with .Resize (printf "%dx%d r90" .Height .Width) }}
    <img src="{{ .RelPermalink }}" width="{{ .Width }}" height="{{ .Height }}">
  {{ end }}
{{ end }}
在上面的示例中,在第二行中,我们反转了宽度和高度,以反映旋转后所需的尺寸。
锚点
使用 Crop 或 Fill 方法时,锚点决定裁剪框的位置。您可以指定 TopLeft、Top、TopRight、Left、Center、Right、BottomLeft、Bottom、BottomRight 或 Smart。
默认值为 Smart,它使用 Smartcrop 图像分析来确定裁剪框的最佳位置。您可以在站点配置中覆盖默认值。
例如,如果您的图像为 400x200,并且左上象限中有一只鸟,您可以创建一个包含该鸟的 200x100 缩略图
{{ $image.Crop "200x100 TopLeft" }}
如果在使用 Crop 或 Fill 方法时应用旋转,请指定相对于旋转图像的锚点。
目标格式
默认情况下,Hugo 以源格式编码图像。您可以通过指定 bmp、gif、jpeg、jpg、png、tif、tiff 或 webp 将图像转换为另一种格式。
{{ $image.Resize "600x webp" }}
要在不缩放的情况下转换图像,请使用原始图像的尺寸
{{ with .Resources.GetMatch "sunset.jpg" }}
  {{ with .Resize (printf "%dx%d webp" .Width .Height) }}
    <img src="{{ .RelPermalink }}" width="{{ .Width }}" height="{{ .Height }}">
  {{ end }}
{{ end }}
质量
适用于 JPEG 和 WebP 图像,q 值确定转换后图像的质量。较高的值会生成质量更好的图像,而较低的值会生成较小的文件。将此值设置为介于 1 和 100(含 1 和 100)之间的整数。
默认值为 75。您可以在站点配置中覆盖默认值。
{{ $image.Resize "600x webp q50" }}
提示
此选项适用于 WebP 图像,它对应于一组预定义的编码参数,并且等效于 cwebp 编码器的 -preset 标志。
| 值 | 示例 |
|---|---|
绘画 |
具有高对比度细节的手绘或线条图 |
图标 |
小型彩色图像 |
照片 |
具有自然光线的室外照片 |
图片 |
室内照片,例如肖像 |
文本 |
主要是文本的图像 |
默认值为 photo。您可以在站点配置中覆盖默认值。
{{ $image.Resize "600x webp picture" }}
背景颜色
当将图像从支持透明度的格式(例如 PNG)转换为不支持透明度的格式(例如 JPEG)时,您可以指定生成图像的背景颜色。
使用 3 位或 6 位十六进制颜色代码(例如,#00f 或 #0000ff)。
默认值为 #ffffff(白色)。您可以在站点配置中覆盖默认值。
{{ $image.Resize "600x jpg #b31280" }}
重采样过滤器
您可以在调整图像大小时指定使用的重采样过滤器。常用的重采样过滤器包括:
| 过滤器 | 描述 |
|---|---|
Box |
简单快速的平均过滤器,适用于缩小图像 |
Lanczos |
高质量的重采样过滤器,适用于摄影图像,产生清晰的效果 |
CatmullRom |
清晰的立方过滤器,比Lanczos过滤器速度更快,同时提供类似的结果 |
MitchellNetravali |
立方过滤器,产生比CatmullRom更平滑的结果,并减少振铃伪影 |
Linear |
双线性重采样过滤器,产生平滑的输出,比立方过滤器更快 |
NearestNeighbor |
最快的重采样过滤器,没有抗锯齿 |
默认值为Box。您可以在站点配置中覆盖默认值。
{{ $image.Resize "600x400 Lanczos" }}
有关重采样过滤器的完整列表,请参阅 github.com/disintegration/imaging。 如果您希望以性能为代价来提高图像质量,您可能希望尝试其他过滤器。
图像处理示例
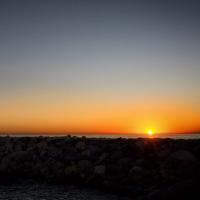
下面示例中使用的日落照片的版权归Bjørn Erik Pedersen所有 (知识共享署名-相同方式共享 4.0 国际许可协议)


这是用于生成上述示例的短代码
{{- /*
Renders the given image using the given process specification.

@param {string} (positional parameter 0) The path to the image, relative to the current page. The image must be a page resource.
@param {string}} (positional parameter 1) The image processing specification.

@returns template.HTML

@example {{< imgproc "sunset.jpg" "resize 300x" />}}
*/}}

{{- with $.Get 0 }}
  {{- with $i := $.Page.Resources.Get . }}
    {{- with $spec := $.Get 1 }}
      {{- with $i.Process . }}
        <figure style="padding: 0.25rem; margin: 2rem 0; background-color: #cccc">
          <img style="max-width: 100%; width: auto; height: auto;" src="{{ .RelPermalink }}" width="{{ .Width }}" height="{{ .Height }}" alt="">
          <figcaption>
            <small>
              {{- with $.Inner }}
                {{ . }}
              {{- else }}
                {{ $spec }}
              {{- end }}
            </small>
          </figcaption>
        </figure>
      {{- end }}
    {{- else }}
      {{- errorf "The %q shortcode requires a positional parameter (1) containing the image processing specification. See %s" $.Name $.Position }}
    {{- end }}
  {{- else }}
    {{- errorf "The %q shortcode was unable to find %q. See %s" $.Name . $.Position }}
  {{- end }}
{{- else }}
  {{- errorf "The %q shortcode requires a positional parameter (0) indicating the image path, relative to the current page. See %s" $.Name $.Position }}
{{- end }}
像这样从您的 Markdown 中调用短代码
{{< imgproc "sunset.jpg" "resize 300x" />}}
图像配置
处理选项
在您的站点配置中定义一个 imaging 部分,以设置默认的图像处理选项。
imaging:
  bgColor: '#ffffff'
  hint: photo
  quality: 75
  resampleFilter: box
[imaging]
  bgColor = '#ffffff'
  hint = 'photo'
  quality = 75
  resampleFilter = 'box'
{
   "imaging": {
      "bgColor": "#ffffff",
      "hint": "photo",
      "quality": 75,
      "resampleFilter": "box"
   }
}
- 锚点
- 请参阅图像处理选项:锚点。
- bgColor
- 请参阅图像处理选项:背景颜色。
- hint
- 请参阅图像处理选项:提示。
- quality
- 请参阅图像处理选项:质量。
- resampleFilter
- 请参阅图像处理选项:重采样过滤器。
EXIF 数据
在您的站点配置中定义一个 imaging.exif 部分来控制 EXIF 数据的可用性。
imaging:
  exif:
    disableDate: false
    disableLatLong: false
    excludeFields: ""
    includeFields: ""
[imaging]
  [imaging.exif]
    disableDate = false
    disableLatLong = false
    excludeFields = ''
    includeFields = ''
{
   "imaging": {
      "exif": {
         "disableDate": false,
         "disableLatLong": false,
         "excludeFields": "",
         "includeFields": ""
      }
   }
}
- disableDate
- Hugo 将图像创建日期/时间提取到
.Date中。将其设置为true以禁用。默认值为false。 - disableLatLong
- Hugo 将 GPS 纬度和经度提取到
.Lat和.Long中。将其设置为true以禁用。默认值为false。 - excludeFields
- 与
.Tags集合中要排除的 EXIF 标签匹配的正则表达式。默认值为""。 - includeFields
- 与
.Tags集合中要包含的 EXIF 标签匹配的正则表达式。默认值为""。 要包含所有可用标签,请将此值设置为".*"。
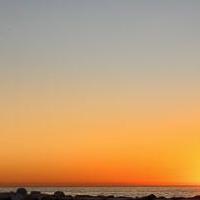
图像的智能裁剪
默认情况下,Hugo 在使用 Crop 或 Fill 方法裁剪图像时使用 Smartcrop 库。您可以手动设置锚点,但在大多数情况下,Smart 选项会是一个不错的选择。
使用上述日落图像的示例
图像处理性能考虑
Hugo 将处理后的图像缓存在 resources 目录中。如果您将此目录包含在源代码控制中,Hugo 将不必在 CI/CD 工作流(例如,GitHub Pages、GitLab Pages、Netlify 等)中重新生成图像。这会加快构建速度。
如果您更改图像处理方法或选项,或者如果您重命名或删除图像,则 resources 目录将包含未使用的图像。要删除未使用的图像,请使用以下命令执行垃圾回收:
hugo --gc